Frequently Asked Questions
The following code minimums shall be considered part of the approved plan, may be superseded by more stringent submitted specifications, and shall not be considered all inclusive of code requirements.
All pools, even temporary use or storable pools require a Building Permit. An Electrical Permit is required for the electrical work associated with pool installations. Storable-type pools may be plugged into a GFI protected outlet that must be at least 10′ from the pool. This is a Connecticut State Statute.
Remember that Pool Safety is the responsibility of the pool’s owner.
A man-made body of water is considered a pool if it meets any of the following conditions.
- The pool is capable of a water level greater than 24″ deep
- If it has a permanent water recirculating system
Pools and spas or hot tubs require permits to ensure the work is done properly and is approved for the proposed location. The requirements for barriers, fences, gates, latches and the means of direct entry into a pool are designed to provide protection against accidental drowning, particularly for small children. However, nothing can replace direct supervision by an adult.
Residential pools/spas are considered as accessory use structures and must meet zoning and environmental protection requirements.
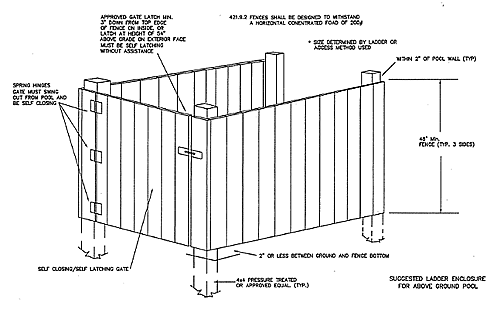
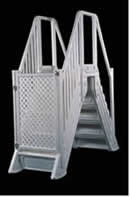
Barrier
- Barrier (fence, pool wall, etc.) shall be not less than 48″ in height and start 2″ max. above grade

- Openings shall not allow passage of a 4″ sphere
- No indentations / protrusions in solid barriers which would create a climbing hazard.
- Horiz. rails less than 45″ apart must be on inside of barrier w/ 1 ¾” spacing
- Horiz. rails spaced 45″ or more vertical / picket spacing max 4″ on center.
Access Gates
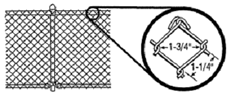
- Maximum chain link fence openings 2 ¼” square
- Maximum diagonal openings (lattice w/ slats etc.) 1 ¾”
Doors providing Direct Access to the pool
- Safety glazing (on poolside) is required in walls & fences enclosing pools that are both within 3′ horiz. and 5′ vert. of a walking surface
- Barriers on top of pool rim require less than 4″ from bottom of barrier to top of pool rim.
- Gate material shall comply with # 1-8 above
- All gates shall be equipped to accommodate a locking device
- Pedestrian access gates shall open outward, away from pool
- Pedestrian access gates shall be self-closing and self-latching
- Other access gates shall have a self-latching device
- All gate latches less than 54″ above the ground shall be inside the gate and the gate material shall have openings ½” maximum within 18″ radius of the latch. The latch shall not be less than 3″ below the top of the gate.
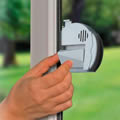
- Option 1 – Be equipped with an audible alarm when the door and its screen, if present, are opened. The alarm shall:
- Commence less than 7 seconds after the door / screen are opened and shall sound continuously for a minimum of 30 seconds
- Have a minimum sound rating of 85 decibels at 10′ and shall be distinctive from other household sounds
- Automatically reset under all conditions
- Be equipped with manual means (touch pads, switches) located at least 54″ above the door threshold to deactivate the alarm for not more than 15 seconds when opening the door / screen from either direction
- Option 2 – Be equipped with a power safety cover in compliance with ASTM F 1346-91
- Option 3 – Be equipped with a self-closing and self-latching device with the release mechanism located a minimum 54″ above the floor. Swinging doors must open away from the pool area
Other
- Pool alarm required
- Temporary enclosure shall be installed prior to the commencement of the installation of any in-ground swimming pool
- All pool and spa suction outlets shall be provided with a cover that conforms with ANSI/ASME A112.19.8M, or a 12″ x 12″ drain grate or larger, or an approved channel drain system.
Start an Application:
First, you must have a profile. Please see “Signing up on OpenGov and Creating a Profile” above for more information.
To navigate to a specific application, click on “Explore” next to the Department or Category name. Then click “Select” next to the type of permit. Lastly, click “Start” to start the application. At that time, you’ll be prompted to login (if you haven’t already done so) and can apply for your permit or license.
Saving Drafts:
Applications can be saved as Drafts and completed at a later time. To save your application, click on “Save and Exit” on the upper right side of the form.
To return to that Draft:
1. Go to your Profile
2. In the Active Records section, click on the Record. All Draft records will be labeled “Draft.”
Paying a Fee
When a fee is due, you’ll be notified automatically via email.
To pay:
1. In the email notification, click on “Pay Online”. You can also go to the site, view your profile, and click on the Record in your Inbox.
2. In the Permit Fee step on the Record page, you’ll see an overview of the fees and you’ll be able to pay automatically with a credit card or e-check.
3. Click on “Pay” to pay the fee then follow the prompts to enter and submit your payment details.
NOTE: The Town of Windsor will still be accepting cash and/or check payments. These forms of payment will only be accepted in person. Please see the office hours below. Checks are to be made out to “Town of Windsor”.
In-person payments will not be subject to a processing fee. However, payments completed online will. For payments completed via credit card, a processing fee of 2.99% of the permit cost, plus 99 cents will be applied. For payments completed via e-check, a flat $2.25 processing fee will be applied.
No. The building department cannot make such recommendations. Ask the builder for references and ask to see samples of previous work.
For a one family owner/occupied unit, a licensed contractor is not required. All townhouses and two family units or more are required to have a licensed contractor perform the work.
Yes, a permit is required when installing windows.
The Fire Marshals office will come to your business or group to demonstrate the safe use of fire extinguishers, help you prepare an emergency plan or provide you the skills to do your own premises evaluation. Contact Building Safety to arrange an appointment.
Fire reports are usually available within several days of a fire. For fastest service please provide the date and location of the fire. Contact Building Safety to arrange an appointment.
Once an application is submitted, all necessary parties from the Town will review the application (including site plans, drawings, etc). The applicant will be e-mailed at the completion of this step. It is then the responsibility of the applicant to call the Windsor Building Department to schedule a Field Inspection, where all necessary parties will examine the work site in person. To schedule an appointment, the applicant must speak with someone in the Building Department directly, leaving a message is not sufficient.
Every permit issued shall become invalid unless the work on the site authorized by such permit is commenced within 180 days after its issuance, or if the work authorized on the site by such permit is suspended or abandoned for a period of 180 days after the time the work is commenced. The building official is authorized to grant, in writing, one or more extensions of time, for periods not more than 180 days each. The extension shall be requested in writing and justifiable cause demonstrated.
All applications will be processed by the Windsor Building Department within 30 days from the completed application submission date.
A permit is required for the removal of an underground storage tank. This removal must be observed by the Fire Marshal.
A building permit is required to convert to a finished basement. Basements have some very specific codes that must be followed. Conversion into a Rec Room is not as stringent as converting to a bedroom space. Life Safety Codes apply including ventilation and means of egress requirements.
Please see the question titled “What do I need to know when finishing my basement?” for more information.
By providing a detailed drawing BEFORE starting the work, we can help you make sure the work is done to code, and save you headaches later.
A building official would be happy to go over the details of your plan.
Often there is a misunderstanding between the contractor and owner as to whom is responsible for obtaining the permits. Be sure that it is clear who is responsible. If the contractor were to be responsible for obtaining the permits, it would be wise to have the contractor provide proof they did so. Or, you may call us at 285-1960 for verification. The owner is ultimately responsible for the work, including permits and required inspections, on their property.
When a plan review, permit, license, certificate of occupancy, certificate of completion, or any other document is issued, the applicant will be notified automatically via email.
To Print Your Document
In the email, click on the “Print” button. This will take you to the Record page. You can also log-in to the OpenGov site, go to your Profile, and click on the Record.
On the Record page, click on the Document Issuance step and click “Print” (toward the bottom right of the preview).
How to sign up:
1. Go to windsorct.viewpointcloud.com
2. In the upper right corner, click “Log In” and select “Sign Up“.
3. Enter your email address and what you’d like your password to be. Passwords must meet the following criteria:
- 8 characters
- 1 upper case
- 1 lower case
- 1 digit
4. Click “Log On”.
5. You can then proceed with applying for a permit. During your first application, you’ll be prompted to complete your profile.
Accessing Your Profile & Records:
To access your profile:
1. Log-in to your OpenGov account.
2. Hover over your icon on the upper right corner.
3. Click on Your Profile.
In your Profile, you can:
| Add a profile picture Review your Active and Complete Records Set your email preferences | Update your contact information View your Inbox (active tasks, due fees, etc.) Set your email notification preferences |
Smoke Detectors
Smoke alarms shall be installed in the following locations:

- In each sleeping room.
- Outside of each separate sleeping area in the immediate vicinity of the bedrooms.
- On each additional story of the dwelling, including basements but not including crawl spaces and uninhabitable attics. In dwellings or dwelling units with split levels and without an intervening door between the adjacent levels, a smoke alarm installed on the upper level shall suffice for the adjacent lower level provided that the lower level is less than one full story below the upper level.
When more than one smoke alarm is required to be installed within an individual dwelling unit the alarm devices shall be interconnected in such a manner that the actuation of one alarm will activate all of the alarms in the individual unit. The alarm shall be clearly audible in all bedrooms over background noise levels with all intervening doors closed.
All smoke alarms shall be listed and installed in accordance with the provisions of this code and the household fire warning equipment provisions of NFPA 72.
When interior alterations, repairs or additions requiring a permit occur, the individual dwelling unit shall be provided with smoke alarms located as required for new dwellings.
Exceptions:
- The smoke detectors may be battery operated and are not required to be interconnected when other remodeling considerations do not require the removal of the appropriate wall and ceiling coverings to facilitate concealed interconnected wiring.
- Alterations to the exterior surfaces of dwellings including, but not limited to re-roofing, residing, window replacement and the construction of decks without roofs are exempt from the requirements of this section.
Ramps are an important feature in accessing a home or other building. This applies not only to people who use wheelchairs but also to those who have difficulty climbing stairs. To be safe and most effective, ramps should be built with a few basic guidelines in mind.
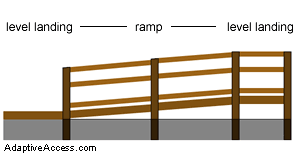
- The maximum slope of a wheelchair ramp should be 1″ of rise for each 12″ of run.
- The maximum rise for any run is 30″. The maximum run 30′.
- The minimum inside clear width of a ramp should be 36″.
- Landings must be provided at the top and bottom of each run.
- The landing should be at least as wide as the ramp, and a minimum of 60″ in length.
- Handrails. If a ramp run has a rise greater than 6 in. or a horizontal projection greater than 72 in. then it shall have handrails on both sides. Top of handrail gripping surfaces shall be mounted between 34 in. and 38 in. above ramp surfaces.

A Building Permit is required for a ramp. You will need:
- A Site Plan showing a sketch of the home and lot showing where the ramp will be placed. Indicate height, length and width of ramp.

- Determine Slope Ratio: Do not build a ramp that are steeper than 1:12. A ramp’s slope – the angle of the inclined surfaces – is perhaps a project’s most critical consideration. A 1 inch of rise to 12 inches or slope.
- Framing Plan (including dimensions, decking, joists, beams, post, *footing and handrail information) *Footing piers may not be required.
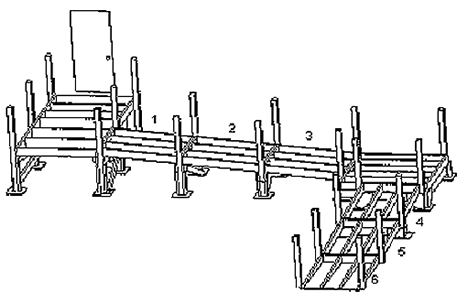
BUILDING A DECK? Here are some deck building basics.
A deck is basically a floor structure supported on posts. Loads on the deck from people, furniture, snow, etc. are transferred from the decking, onto joists, to beams, down posts, to foundations and into the soil below. All of these components play an important role in the function of the deck and must be sized and constructed properly to make the deck safe.
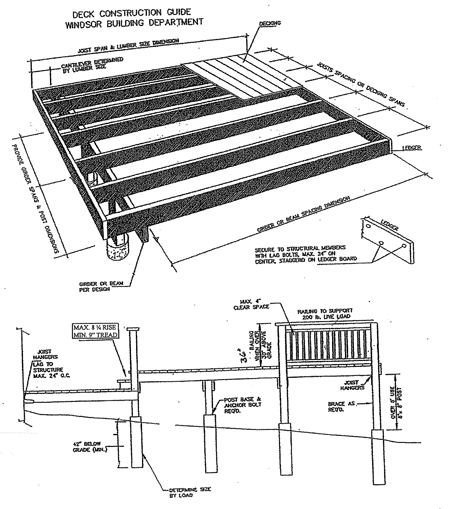
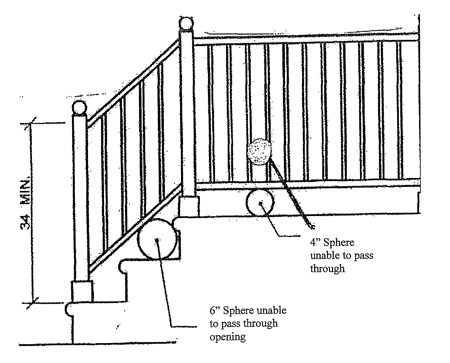
GUARDS
When guards are required, porches, balconies or raised floor surfaces located more than 30 inches (762 mm) above the floor or grade below shall have guards not less than 36 inches (914 mm) in height. Open sides of stairs with a total rise of more than 30 inches (762 mm) above the floor or grade below shall have guards not less than 34 inches (864 mm) in height measured vertically from the nosing of the treads. Porches and decks which are enclosed with insect screening shall be provided with guards where the walking surface is located more than 30 inches (762 mm) above the floor or grade below. 8312.2 Guard opening limitations. Required guards on open sides of stairways, raised floor areas, balconies and porches shall have intermediate rails or ornamental closures which do not allow passage of a sphere 4 inches (102 mm) or more in diameter.
Exceptions:
- The triangular openings formed by the riser, tread and bottom rail of a guard at the open side of a stairway are permitted to be of such a size that a sphere 6 inches (152 mm) cannot pass through.
- Openings for required guards on the sides of stair treads shall not allow a sphere 4 3/8 inches (107 mm) to pass through.
Openings for required guards on the sides of stair treads shall not allow a sphere 4 3/8 inches (107 mm) to pass through.
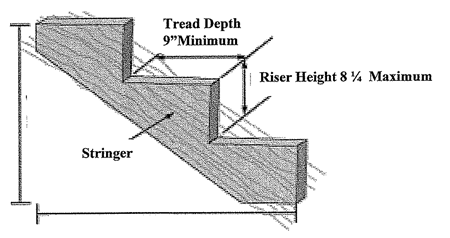
STAIRWAYS
WIDTH: Stairways shall not be less than 36 inches in clear width at all points above the permitted handrail height and below the required headroom height. Handrails shall not project more than 4.5 inches on either side of the stairway and the minimum clear width of the stairway at and below the handrail height, including treads and landings, shall not be less than 31.5 inches where a handrail is installed on one side and 27″ where handrails are provided on both sides.
HEADROOM: The minimum headroom in all parts of the stairway shall not be less than 6 feet 8 inches measured vertically from the sloped plan adjoining the tread nosing or from the floor surface of the landing or platform.
RISER HEIGHT: The maximum riser height shall be 8 ¼ inches. The riser shall be measured vertically between leading edges of adjacent treads. The greatest riser height within any flight of stairs shall not exceed the smallest by more than 3/8″.
TREAD DEPTH: The minimum tread depth shall be 9 inches. The tread depth shall be measured horizontally between the vertical planes of the foremost projection of adjacent treads and at a right angle to the tread’s leading edge. The greatest tread depth within any flight of stairs shall not exceed the smallest by more than 3/8 inch.
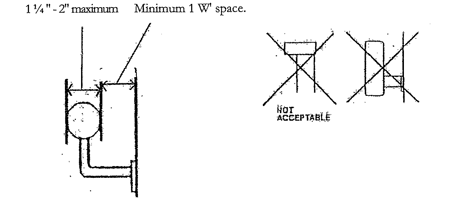
HANDRAILS
HANDRAIL GRIP SIZE: All required handrails shall be of one of the following types or provide equivalent grasp ability.
Type I: Handrails with a circular cross section shall have an outside diameter of a least 1 ¼ inches (32 mm) and not greater than 2 inches (51 mm). If the, handrail is not circular it shall have a perimeter dimension of at least 4 inches (102 mm) and not greater than 6 ¼ inches (160 mm) with a maximum cross section of a dimension of 2 ¼ inches (57 mm).
Type II: Handrails with a perimeter greater than 6 ¼ inches (160 mm) shall provide a grasp able finger recess area on both sides of the profile. The finger recess shall begin within a distance of ¾ inch (19 mm) measured vertically from the tallest portion of the profile and achieve a depth of at least 5/16 inch (8 mm) within 7/8 inch (22 mm) below the widest portion of the profile. This required depth shall continue for at least 3/8″ (10 mm) to a level that is not less than 1 ¾ inches (45 mm) below the tallest portion of the profile. The minimum width of the handrail above the recess shall be 1 ¼ inches (32 mm) to a maximum of 2 ¾ inches (70 mm). Edges shall have a minimum radius of 0.01 inches (0.25 mm).
CONTINUITY: Handrails for stairways shall be continuous for the full length of each flight, from a point directly above the top riser of the flight to a point directly above the lowest riser of the flight. Handrail ends shall be returned to a wall or shall terminate in newel posts or safety terminations. Handrails adjacent to a wall shall have a space of not less than 1 ½ inch between the wall and the handrails.
Exceptions:
- Handrails shall be permitted to be interrupted by a newel post at a level landing.
- The use of a volute, turnout, starting easing or starting newell shall be permitted over the lowest tread.
DECK JOIST TABLE
| Southern Pine | 2×6 | 16″ on center | 9’5″ |
| Southern Pine | 2×8 | 16″ on center | 12’5″ |
| Southern Pine | 2×10 | 16″ on center | 15’10” |
| Southern Pine | 2×12 | 16″ on center | 18’10” |
The above spans are from Southern Pine Joist and Rafter span chart for a 40-pound per square foot (psf) live load and a 10 psf dead load with a 360 deflection and a moisture content above 19% due to exposed exterior location. Additional span information is available in the Building Department.
Posts to girder attachment should be braced to prevent girder from “rolling.” Any seams or splices in the girder must be over the posts.
Decks not supported by dwelling do not need frost protection footings.
- Wood must be pressure treated or naturally decay resistant.
- Fasteners must be compatible with wood used.
- Piers are required to be 42″ deep for frost protection. Piers should be minimum 8″ round and depending on size of deck possibly larger.
- Posts must be of sufficient size to support loads, and positively attached to piers.
- Beams must be positively attached to posts with gussets or hardware designed for this purpose.
- All splices in beams must be supported by posts. No mid-span splices. Beams required to have minimum 1 ½” bearing on wood and 3″ on concrete.
- Joists shall be supported by properly sized hanger, or minimum 2″x2″ ledger strip.
- If deck is greater than 5′ high, depending on size and structural details, diagonal bracing may be required at posts.
IMPORTANT INFORMATION REGARDING DECKS AND HARDWARE
Connecticut State Building Code Section R319.3 amends the 2003 International Residential Code regarding fasteners allowed to be used on pressure preservative and fire retardant wood as follows:
(Amd) R319.3 Fasteners and weight bearing connecting devices used for pressure preservative and fire-retardant treated wood shall be of stainless steel, silicon bronze, copper, G185 galvanized steel, or shall be hot-dipped after fabrication.
It is very important that when you purchase hardware, including lag screws, washers, joist hangers, screws and all other fasteners in contact with pressure treated wood, it meet these standards, or excessive corrosion will result.
In addition aluminum flashing cannot come in contact with preservative treated wood unless it is painted or coated with material to prevent contact with lumber.
Do not use old hardware on new preservative treated lumber either. There is a wealth of information available on the internet if you wish to further research this issue.
As an example: If purchasing Simpson hardware for a 2×8 joist hanger their designation of LUS 28 would not be acceptable but would have to be stamped with LUS28Z.
The “Z” designation shows G185 standard is met and “HDG” designation shows hot dipped galvanized standard is met.
Of course you may also use the other materials including stainless steel, copper or silicon bronze, but this material is typically more expensive.
A Building Permit is required for sheds over 200 Sq Ft.
Sheds must be sited in accordance with zoning. If located behind the plane of house, it may be located a minimum of 6′ from both the side and rear property lines. If the house is on a corner, you must honor two front yard required distances and 6′ can be from the other 2 sides.
Must be at least 10′ from the principal building or any other accessory building.
SHEDS UNDER 600 SQUARE FEET:
No foundation or piers required but they must be anchored down by an approved method for wind load requirements.
If the shed is a pre-fabricated structure, a sketch, or diagram must be provided showing the proposed framing and support method. A brochure from the seller with a drawing of the structure will generally suffice.
For constructed on site sheds, type and size of the lumber, and how the structure will be framed should be shown. Size, method, and depth of the supports should be indicated.
Indicate on a plot plan, property survey, or sketch drawn to scale where the shed will be placed on the property.
Please Note: Per the Windsor Zoning Regulation, the maximum building height is one story or 15 feet. The total floor area of all accessory buildings on a lot shall not exceed 580 Sq. Ft. or 20 percent of the area of the required rear yard, whichever is greater.
SHEDS OVER 600 SQUARE FEET:
Must be supported by piers, foundation, or similar method acceptable to the Building Official. Supports must be down a minimum of 42″ below grade (frost line) to prevent heaving.
A Building Permit is required to convert to a finished basement. Basements have somevery specific codes that must be followed. Conversion to a Rec Room is not as stringent as converting to a bedroom space. Life Safety Codes apply including ventilation and means of egress requirements.
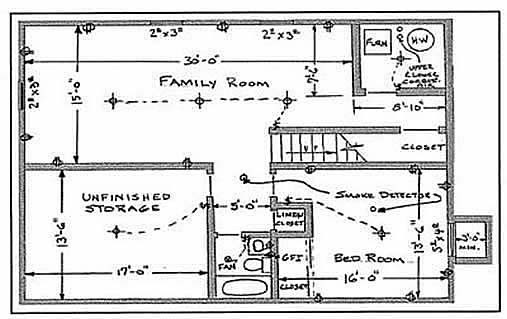
How to Use the Guide
Provide two sets of plans and complete the following:
- Review this Building Guide
- Provide 2 Floor Plans
- Fill out a Building Permit Application
The majority of permit applications are processed with little delay. The submitted documents will help determine if the project is in compliance with building safety codes, zoning ordinances and other applicable laws.
Directions
- Submit two complete sets of required information
- Draw a floor plan with dimensions drawn to scale, showing the layout of the entire basement.
- Label the use for all of the rooms.
- Show electrical outlets, smoke detectors, lighting, fans, plumbing modifications, cleanouts, furnace, and water heater.
- List window sizes and types, identify emergency escape and rescue windows, and egress window wells with ladder and clear dimensions of window well.
- Identify modifications to the existing structure such as posts, beams and floor joists.
- Indicate height of dropped ceiling areas.
- A shower or tub equipped with a showerhead shall have a minimum ceiling height of 6’8” above a minimum area 30” by 30” at the showerhead.
- Show clearance around the tub and fixtures.
By providing a detailed drawing BEFORE starting the work, we can help you make sure the work is done to code, and save you headaches later.
A building official would be happy to go over the details of your plan.
Example:
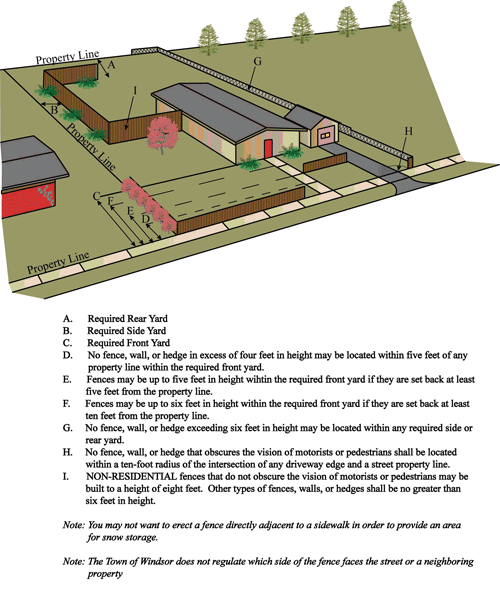
- No permit is required for a fence.
- Fences can be placed up to and on the property line.
- You must know where the property boundaries are (property survey, boundary markers – pins or monuments).
- We recommend you verify the property line with the neighboring property owners before you begin the work to identify any disputes.
- Must be in accordance with Sections 3.1.2B and 14.1.8 of the Windsor Zoning Regulations.
3.1.2 B – Fences, Walls, and Hedges
- Residential Fences, Walls, and Hedges
- No fence, wall, or hedge in excess of four feet in height may be located within five feet of any property line within the required front yard. Higher fences, walls, or hedges up to a maximum height of six feet may be erected within the required front yard if they are set back five feet from the property line for each additional foot of height.
- No fence, wall, or hedge exceeding six feet in height may be located within any required side or rear yard.
- No fence, wall, or hedge that obscures the vision of motorists or pedestrians shall be located within a ten-foot radius of the intersection of any driveway edge and a street property line.
- Non-Residential Fences, Walls, and Hedges
Fences that do not obscure the vision of motorists or pedestrians may be built to a height of eight feet. Other types of fences, walls, or hedges shall be no greater than six feet in height.
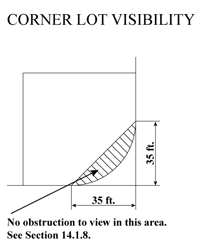
14.1.8 Visibility at Intersections
To maintain a clear line of sight for motorists at intersections, no wall, fence, structure, planting, or other visual obstruction exceeding a height of two feet above the street grade (except for trees with a clearance of at least six feet below the canopy) shall be located within the triangular area formed by two lines measuring 35 feet along each intersecting street line from the point of intersection and a straight line or hypotenuse connecting those lines.
OpenGov requires applicants to have a valid email address to get the most out of the platform and to ensure proper record keeping. In case an applicant does not have an email address, you can stop by the Building Department for assistance.
OpenGov is the software program that powers the Town of Windsor’s new online permitting center. Through OpenGov, you can apply for a permits online. With this system, you will be able to submit an application from anywhere, 24/7, monitor the status of the application online and receive notifications via email as your application is reviewed and processed.
Given the expected demands on fossil fuels (oil and gas) winter heating season, it is anticipated that many homeowners may seek to supplement the heating of their homes by using wood or other solid fuels this winter. Remember, you are bringing FIRE into your home by installing a solid fuel-burning appliance. Safety is imperative. The following information is intended to assist those considering using solid fuel-burning equipment and fireplaces to heat their. This Fact Sheet should not be used as a substitute for all applicable requirements of the Building Code, Boiler Regulations, or the Appliance Manufacturer’s installation, operation and maintenance requirements.
General Requirements
Solid fuel-burning appliances include: factory-built fireplaces, coal-burning appliances, wood stoves, wood pellet stoves, corn and nut shell-burning pellet stoves, wood-fired boilers and any other solid fuel-burning appliance intended to provide heat to a building or space within a building, as well as certain ancillary components such as factory-built chimneys, vent piping and certain specialized installation components for some products.
Solid fuel-burning appliances utilized within the dwelling must be:
- Listed as tested in accordance with National Safety Standards and labeled for the intended use.
- Placed a safe and established distance from combustible materials such as wood, draperies, furniture, carpets, wood flooring, etc..
- Properly vented to the outside of the building. The appliance does not share a flue or vent with other appliances.
- Installed and operated in accordance with all applicable Building Code requirements and those of the appliance manufacturer.
- The Building Permit is obtained prior to installation; inspected by building official to ensure compliance with the Building Code and the building inspector has inspected the appliance after installation but before use.
*If you have any questions about properly installing a solid fuel-burning appliance, you should contact the Fire Marshal at 285-1971
** It is strongly recommended that smoke detectors and carbon monoxide (CO) alarms be installed
This depends on the remodel work. Changing, moving or repairing walls, floors, ceilings etc. requires a Building Permit. This does not cover cosmetic items like new carpet, linoleum, painting, etc. Changing, moving or repairing electrical requires an Electrical Permit. Changing, moving or repairing mechanical requires a Mechanical Permit. Changing, moving or repairing plumbing requires a Plumbing Permit.
Some items require two permits like a Central Air Conditioning. The air conditioner is mechanical requiring a Mechanical Permit and the electrical for the AC requires an Electrical Permit.
The owner is ultimately responsible for the work, including permits and required inspections of their property. However, this may be delegated to the architect, contractor or other agent.
Any person doing work who is not currently registered with the State of Connecticut is doing so illegally. Using a licensed contractor provides some protection to the homeowner from being charged for work and materials not provided. Materials and suppliers and subcontractors can place a lien on your home if they do not receiver payment from your contractor. Trade licenses for those persons doing Home Improvement, Plumbing, Electrical, or Mechanical provide some assurance that they have adequate knowledge and training in those fields.
The Building Dept. Verifies the license and insurance of all contractors applying for a permit.
If you are not hiring a registered contractor, you are missing out on $15,000 worth of protection!
The Dept. of Consumer Protection protects the homeowner by the Home Improvement Guaranty Fund. The fund can reimburse consumers up to $15,000 who are unable to collect for loss or damage suffered from a registered contractor’s performance or offer to perform a home improvement. To find out if your contractor is registered contact the Dept. of Consumer Protection at 1.800.842.2649 or visit the website.
http://www.dcpaccess.state.ct.us/DCPPublic/LicenseLookup.asp